Overview
Tour dates and prices
Equipment
Location
Essential Information
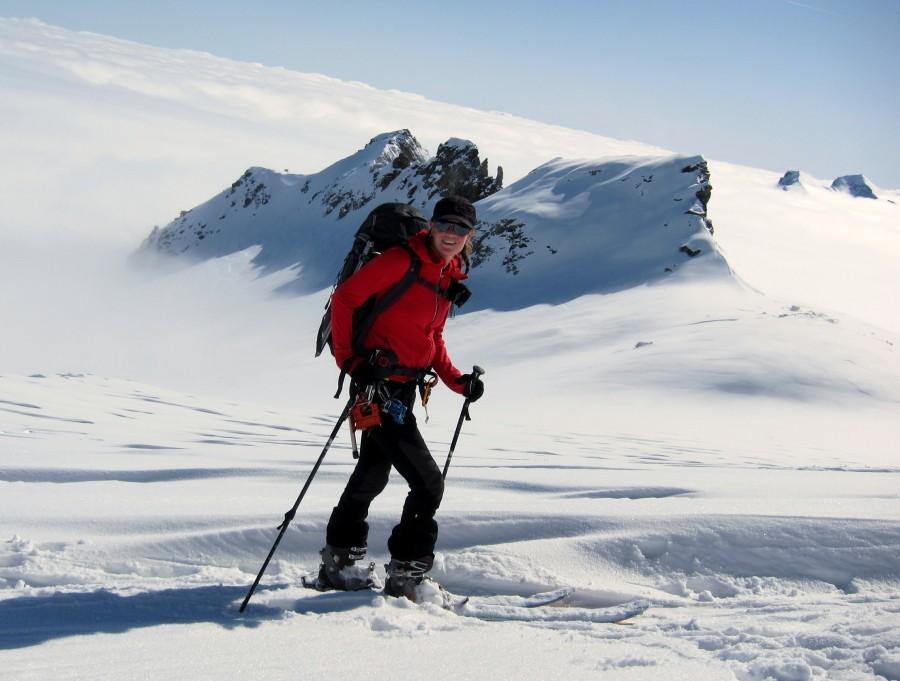
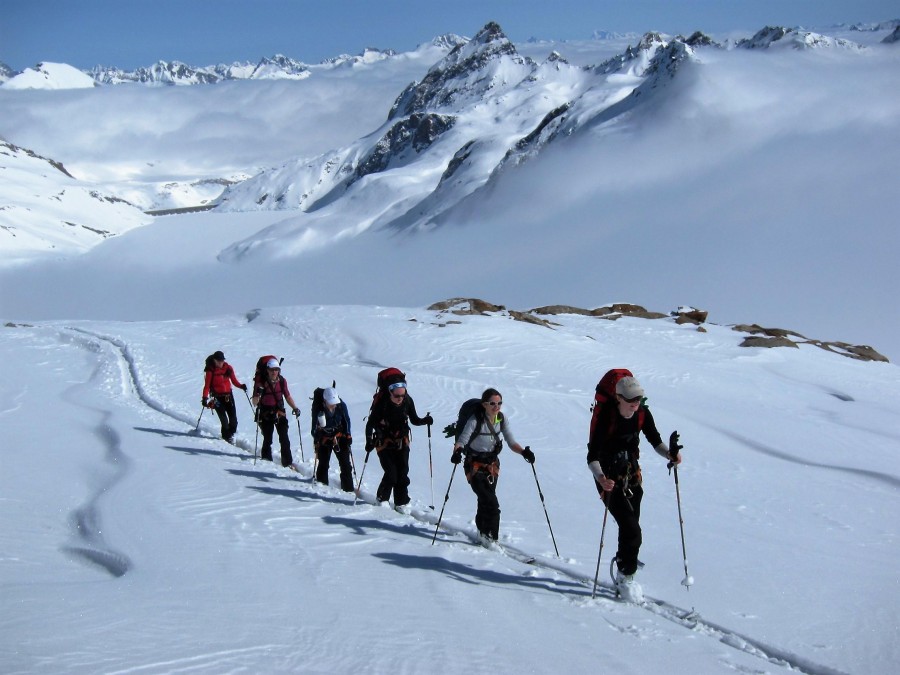
Discover the Hidden Beauty of the Tour de Soleil Ski Tour
The Tour de Soleil is a spectacular hut-to-hut ski touring adventure that follows an ancient smugglers’ trail through one of the most secluded and scenic corners of the Swiss Alps. This unique route weaves across the Swiss-Italian border, taking full advantage of the region’s well-kept mountain huts and offering a true escape from the crowds. With moderate terrain and plentiful opportunities to summit peaks en route, this tour is ideal for those seeking solitude, stunning scenery, and authentic backcountry experiences.
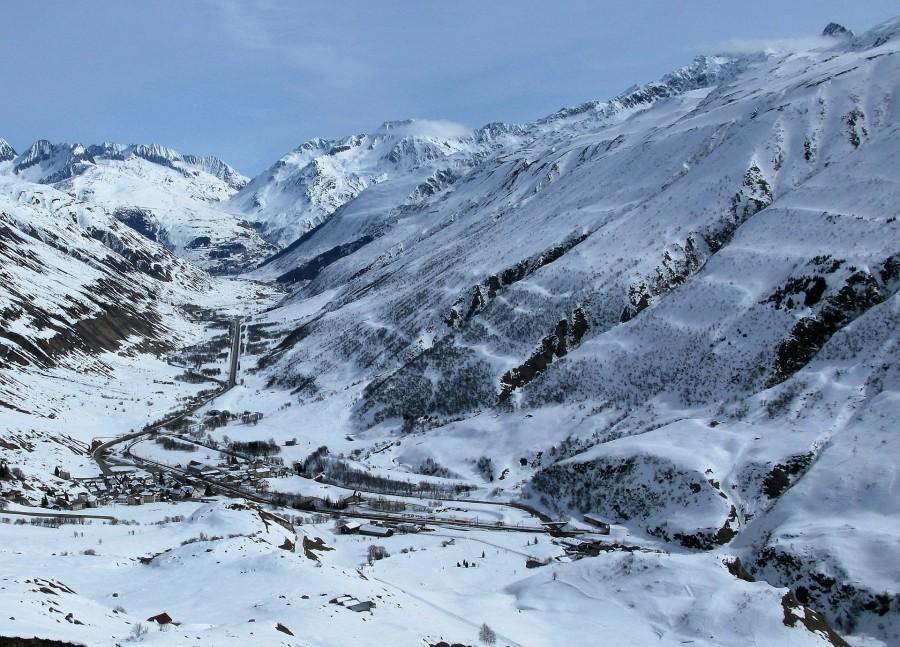
We begin our journey in the remote Binntal Valley near the Rhône Glacier. Still largely untouched by mass tourism, Binntal retains a wild, off-the-beaten-path character. Accessible only since 1965 via a single tunnel, the valley feels frozen in time, perfect for a classic ski touring adventure.
Day Itinerary
-
Arrive in the traditional Swiss alpine town of Brig, easily accessible by train. Meet your IFMGA mountain guide at the hotel. A quiet mountain village that retains its authentic Swiss charm. Overnight stay with easy access to the Gemsstock lift system for optional warm-up skiing or touring.
-
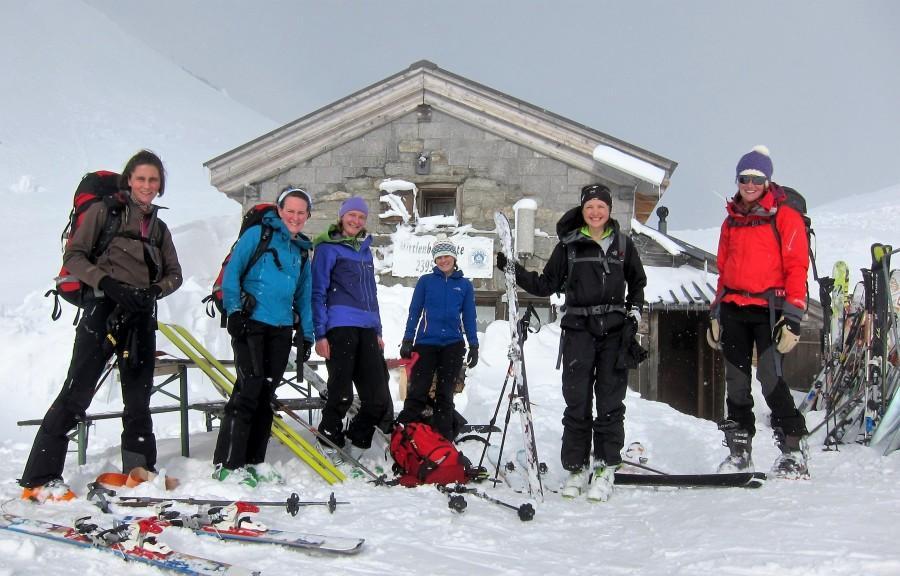
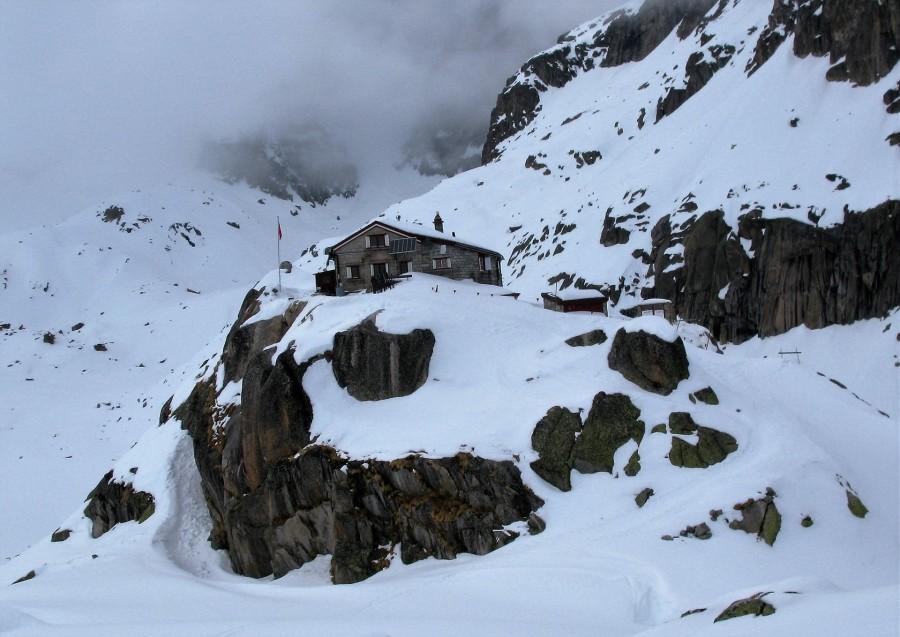
We take the scenic train journey through the Furka tunnel to Fiesch (approx. 1 hour), followed by a short taxi ride to the secluded village of Binn. Depending on snow conditions, we may start from Fald, further up the valley. From here, we skin along an old smugglers' trail, gradually ascending beside the river before a steeper climb to Mittlenberg (2506m). We overnight at the traditional Mittlenberghütte (2395m), offering panoramic views across the Northern Valais.
Approx. 4 hours ski touring. -
A big day begins with the ascent of Offenhorn (3236m), a dramatic and remote peak on the Swiss-Italian border. From the summit, we descend via Passo del Sabbione, with an optional climb of Punta del Sabbione (3182m) depending on time and conditions. A spectacular descent down the Hohsandgletscher brings us into Italy. After a final climb, we reach Rifugio Claudio e Bruno, known for its hearty Italian food, wine, and the rare hut luxury of hot showers.
Approx. 6 hours ski touring. -
We ascend the tour’s highest peak, Blinnenhorn (3374m), a classic ski mountaineering objective offering breathtaking views across to the Finsteraarhorn (4274m). The route includes steep kick turns to reach the Sella del Gries (3112m), followed by a steady climb up the Griesgletscher. Crampons may be required on the final section. We descend to Capanna Corno Gries (2338m), a modern hut nestled in a remote high-alpine setting.
Approx. 5 hours ski touring. -
Today we ski a loop day tour from Corno Gries, collecting any stored gear before descending and climbing through the remote Val Bedretto. We ascend through larch forest to reach the charming Rifugio Piansecco, beautifully situated in a peaceful alpine clearing above All’Acqua (1600m).
Approx. 4–5 hours ski touring. -
An early start for a long ascent to Passo Rotondo (2754m). A short, steep section may require crampons. From the summit, we traverse the northern slopes and climb to the striking Witenwasserenpass, marking the triple watershed between the Rhine, Rhone, and Po river basins. A scenic descent down the Witenwasseren Glacier brings us to the Rotondo Hut (2570m). Conditions permitting, there’s an optional ascent of Witenwasserenstock.
Approx. 6 hours ski touring. -
Our final summit is Piz Lucendro (2962m), a classic finish to the tour. A steady 3-hour skin leads to the Giaccio del Lucendro, with a final 150m ascent—potentially requiring crampons—to the dramatic summit cross. From here, we trace the entire week’s route, from Offenhorn to Blinnenhorn. On clear days, the Mont Blanc massif is visible in the distance. The tour ends with a superb descent of the west face and glacier to Realp, followed by a short train ride back to Brig for a celebratory final night.
Approx. 5 hours ski touring. -
After breakfast, depart at your convenience. Rail connections are available for Zurich, Geneva, and other major hubs.
Please note the route and daily objectives may vary depending on weather, snow conditions, and group experience.
2027
Dates |
Price |
||
|---|---|---|---|
| Sat 13 Mar - Sat 20 Mar |
£1775 | Book | |
| Flexible | From £1,775 | PRIVATE GROUP | Enquire |
The price includes:
- all guide fees and expenses
- 2 nights B&B hotel accommodation (Austrian twin-bed share)
- 5 nights half board in a mountain refuge (dormitory-style)
The price does not include:
- lift pass
- local transport
- lunches
- beverages
- evening meals in Andermatt
- equipment hire, travel to/from Andermatt
*Single rooms subject to availability and supplement.
DISCOUNTS
We’re pleased to offer an exclusive discount to members of the Ski Club of Great Britain. This offer applies to eligible bookings made by 31 December 2026 when a valid discount code is entered at checkout.
Click here to find your discount code.
BOOK WITH CONFIDENCE
When you book with Mountain Tracks, your money is protected. Please read on to understand how different types of holidays are protected.
Package holiday with flights
If you have booked a package holiday with flights departing the UK, your money is protected under our Air Travel Organiser's Licence (ATOL) with the Civil Aviation Authority (CAA). Our ATOL number is 4488. When you pay you will be supplied with an ATOL certificate. Please ask for it and check to ensure that everything you booked (flights, accommodation and other services) is listed on it. Please see our booking conditions for further information or for more information about financial protection and the ATOL Certificate go to www.caa.co.uk/atol-protection/.
In the unlikely event that Ski Safari becomes insolvent, the CAA will arrange any refund of your money paid to us before the start of your holiday. If you are already on holiday, the CAA will arrange your repatriation to the UK.
Package holiday without flights
If you have booked a package holiday without flights departing the UK, your money is protected through our membership of ABTA. Our ABTA membership number is Y3035. We have provided a bond to ABTA to meet the requirements of the Package Travel and Linked Travel Arrangements Regulations 2018 and you have the benefit of ABTA's assistance and Code of Conduct. Please see our booking conditions for further information or for more information about financial protection and ABTA go to www.abta.com/tips-and-advice/is-my-money-protected.
In the unlikely event that Ski Safari becomes insolvent, ABTA will arrange any refund of your money paid to us before the start of your holiday. If you are already on holiday, ABTA will arrange your repatriation to the UK.
Ski extras only bookings
Bookings for ski extras only (season passes etc.) are also protected through our membership of ABTA and our bond.
Payments
We accept payment by secure bank transfer direct to our account or by card (not Amex). We do not accept payment by cheque or in cash.
This is an extensive list of the recommended clothing and equipment you will need if you are coming to one of our Ski Tours.
During the tour you will be staying most nights in catered high mountain huts and will need to carry all the equipment and clothing you require for the duration of the tour. The huts are comfortable but basic with limited facilities.
Any clothing or other items not required on the tour can be left in a travel bag at your first hotel ready for your return on the final night.
We recommend keeping the weight of your pack as light as possible. If you are new to alpine multi-day ski touring, try taking your pack out on the slopes before the tour to see how it feels. You quickly realise the benefit of ‘skiing light’.
If you are uncertain or need further information, don't hesitate to contact us.
-
Ski Touring - Clothing
When choosing clothing for ski touring you want to think light, warm and versatile. During the trip weather conditions will change and you’re likely to go from warm afternoons where you’ll be carrying most of your gear in your rucksack, to icy-cold mornings when you’re wearing everything to keep warm! Getting hold of the best and lightest kit available is always worth it and most of the major brands will be able to supply a suitable kit.
This season, we’ve partnered with Ortovox to provide us with the very best safety kit and clothing. Our guides will all be decked out in the latest Ortovox jackets and trousers and will keep warm, dry and comfortable thanks to their technical wool base- and mid-layers. Our guides couldn’t recommend their kit more highly.
- Roll neck rather than a scarf. We use and recommend the ‘Buff¹ ¬ a light, stretchable tube. Excellent despite the name! They do both a fleece/cotton version for warmth or just a cotton one (to keep the sun off).
- Headwear to include warm hat and sun-cap or wide-brim hat for extra protection from the sun. Mountain Tracks fully supports the wearing of helmets for skiing, although not mandatory for any of our trips we do recommend them.
- An outer shell jacket made of waterproof and breathable material like Gore-Tex or similar with a built-in hood. The lighter the better and so a shell is recommended rather than an insulated jacket.
- 1-2 thin fleeces - rather than a thick layer between your skin and the outer shell - an approach which gives better heat retention and good flexibility. These tops are known as ‘mid layers’. The principle of ‘layering’ e.g. allowing you to easily add/remove layers depending on the temperature and the activity is recommended to ensure comfort on the mountain.
- Insulation layer like a down or Primaloft jacket is a good item to have ready to wear in the event of cold weather, it can live in your rucksack as a spare layer and can come in very handy for sudden changes in the weather.
- For the lower half it’s essential that you have a pair of thermal base layer pants (long johns).
- These can then be combined with either:
- (a) a good pair of ‘technical shell’ pants in a waterproof and breathable fabric like Gore-Tex (b) a pair of mountain or alpine pants in a softshell material together with a pair of lightweight, breathable over trousers with long side zips.
- Top and bottom underwear made of a synthetic, wicking material. Very popular at the moment are the wool based layers from companies such as Ortovox. They are comfy, breathable and warm when needed and can be worn for days without your friends catching a whiff!
- Good quality Gore-Tex gloves or mitts and a thin pair of softshell or fleece gloves for when it is hot and for ski touring in. Silk inner gloves can be useful if the weather is cold and you suffer from cold hands.
- Technical Socks - Investing in good quality ski socks will improve fit, warmth and feel when skiing for long periods. Bring along a few pairs.
-
Ski Touring - Ski Equipment
For all touring trips it is essential you ski with an all-mountain/freeride type skis, ski touring boots and ski touring bindings. If you have your own skis but they do not have ski touring bindings then you will need to rent skis. The same applies if you have downhill ski boots, you will need to rent ski touring boots.
SkisThis winter our lead guides are using Elan skis. Praised by magazine testers and professional skiers alike for its unique blend of lightweight performance, the Ripstick 96 is proven to be the ultimate freeride ski in all snow conditions. The Ripstick 106 is the ultimate freeride ski for any terrain. From boundary line to the base lodge, peak to the parking lot, and trailhead to tailgate this ski excels in all conditions. The new Ripstick Tour 94 is designed on a wider platform, enabling the skier to float better, ski faster, and turn easier in backcountry conditions.
It is built to blend high performance at a low weight, for the perfect mix of freeride downhill performance and efficient ascending capability. With Ripstick Tour 94, the confidence to conquer long ascents and charge challenging descents is the name of the game.
There are many ‘all-mountain/freeride’ skis to choose from and we also recommend skis from Salomon, Dynastar, Movement, Black Crows, Trab Skis, Scott and Volkl. Look for a ski that is the right size for your height, typically the tip of the ski should be somewhere around your nose height. As for the width of the ski or “side cut” a mid-fat ski – 90-110mm under the foot is a good place to start; this offers plenty of flotation off-piste while remaining suitable for day tours and they should also handle reasonably well on piste and mixed terrain.
Elan Skis: www.elanskis.com
Dynastar Skis: www.dynastar.com
Movement Skis: www.movementskis.com
Black Crows Skis: www.blackcrows-skis.com/
Trab Skis: www.skitrab.com/en-us/
Scott Skis: http://www.scott-sports.com
Volkl Skis: http://www.voelkl.com
There are plenty of other great skis to choose from so if you’re planning on buying skis for ski touring or general skiing and have any questions do not hesitate to call us, or Lockwoods, to discuss the options available.
If you are planning on buying skis for ski touring and general skiing and have any questions do not hesitate to call us to discuss the options available to you.
BootsIt is essential that you have ski touring boots for these trips as walking uphill is much more comfortable in these types of boots with a walk mode and great flex; a dedicated touring boot or a hybrid hike & ride boot is best.
Our guides are using ROXA boots. They recommend R3 ski boots, the lightest high-performance alpine ski boot in its class. The 110 TI is geared for big mountain chargers who may use “Tech” and/or Alpine bindings and often hike or skin to find their lines. The RX Tours is targeted toward skiers who prefer to blaze their own trail and leave the lift lines behind.
Scarpa has led the way in touring boots for many years but they have been joined by other manufacturers like Dynafit, Salomon, Scott, Black Diamond, Dalbello and K2; all producing their own versions of ski touring boot.
ROXAR3 and RX Tour ski boots provide a range of models suitable for all sorts of terrain and snow conditions. It is a family-owned company located in Italy, focused on advanced materials, and ultralight compounds and one of the first companies to use
• Scarpa’s Freedom boots are their Hybrid offerings, with great ski performance, a walk mode and Vibram sole. Their Maestrale (men’s) and Gea (women’s) boots are also highly recommended.
• The Scott Celeste and Cosmo boots have stood the test of time and are good all-around choices.
• Salomon’s Quest Max series offer boots with a walk mode in various flex’s with good downhill performance.
• Dynafit offer the Mercury or Vulcan boots plus a range of lightweight options like the TLT6.
The best of the rest are:
Fischer - Transalp
Black Diamond – Quadrant and Factor
K2 – Pinnacle boot
Dalbello – Lupo or Sherpa
Langue – XT series offer a ski boot with a walk mode in various flex options
Boot Liners
These days many manufacturers offer ‘thermo-fit¹ liners as standard equipment. You may also want to consider a custom liner as these are heated and molded to your foot and boot for a perfect fit. They can make all the difference especially if you have trouble finding really comfortable ‘off-the-shelf’ boots. Zipfit liners are a great option for anyone seeking total customisation in fit and comfort. They will replace the original liner.
Custom Footbeds
Essential kit – to provide additional comfort and ski control. If you want to get footbeds made or a pair of new boots fitted then we suggest you visit somewhere like Profeet for a professional fitting. Don’t forget if you have footbeds in your downhill boots but need to rent touring boots then you can bring the footbeds with you and put them in the hire boots.
Bindings
For all ski touring trips ski touring bindings are essential. Fritschi and Marker both make excellent ski-touring bindings and you have a few different options to choose from. Many more people are seeing the advantage of the “pin” binding system now offered by a number of manufacturers as these are light and offer ever-improving security despite their minimalist looks!It’s essential you have ski touring bindings on your skis. Although Pin bindings have been around since the Dynafit Low Tech bindings over 30 years ago since their patent expired the technology has advanced substantially. Salomon, with their Shift Binding, are at the forefront; they’re ‘multi norm compatible’ so fit a selection of boots and are lighter than most freeride bindings. Our lead guides are using the Shift binding this winter, so if you’d like to know more about them give Lockwoods a ring.
Ski Poles
We recommend telescopic poles. They must have wide powder baskets (4-5 inches/100-120mm diameter) otherwise you’ll be up to your armpits on the ascents. Go for an alloy rather than carbon poles which are lighter but have a nasty habit of snapping near the basket due to ski edge nicks.
Rucksack
For most ski tours especially multi-day hut-to-hut tours you will need a 35 - 40 litre rucksack. You might get away with a big 30 liter pack if you are an experienced ski tourer and know what to pack. Most people will find a 35-40 liter pack is a good size for touring.
Key features of a good ski touring pack:- a method of attaching your skis in either an A-frame (one either side) or both together on a diagonal ski carriage
- easy access into the main compartment without having to empty the sack to get something at the bottom
- separate pocket for avalanche shovel, handle and probe
- small top pocket for items like wallet, sunglassed/goggles etc; an ice axe loop
- built-in rain cover and a secure method of attaching/stowing a ski helmet
- good hip/waist belt and adjustable shoulder straps
Ortovox Haute Route 40 rucksack will be a good choice for ski touring trips.
Avalanche airbag rucksacks can be used for touring but they are heavy, adding somewhere between 5-8kg just for an empty pack plus canister. So unless you are sure you can carry it and fit all you need in, we do not recommend you use one.
Over a long multiday tour, every gram of weight is important as you have to carry and move it yourself. Carrying a heavy pack will hinder and tire all but the most experienced and fit ski tourer.
-
Ski Touring - Technical Kit
- Ski Skins – these are skins which, now made of artificial fabric, stick to the bottom of your skis and allow you to walk up hill. They must be cut to fit your skis exactly, so if you are bringing your own skis you must provide your own skins.
- Ski Crampons (aka couteaux) - most ski touring bindings have ski crampons specifically designed for the binding. We always carry these just in case. Again if you are bringing your skis and touring bindings you must provide your own ski crampons.
- Ice Axe - general lightweight mountaineering / alpine pick. Ideally this needs to be short enough to fit in your pack.
- Boot Crampons - ideally lightweight aluminum ones although steel crampons are required for more demanding tours
- Climbing Harness - a simple lightweight harness. The key feature is that it should have fully adjustable leg loops for putting on over ski boots, crampons, etc.
- Helmet - Some people choose to ski tour with a helmet, this is up to you. If you bring a Normal ski helmet they are heavy to carry. Many manufacturers now have lightweight ski touring helmets that work well.
On some tours in non-glaciated terrain, an ice-axe, boot crampons and climbing harness may not always be required. However, as conditions and itineraries can change, we generally recommend bringing these items with you. If you do not own these items they can be rented to you by our guides or via one of the local sports shops. -
Ski Touring - Safety Equipment
The “Safety Trilogy” - required on all our ski tours and off-piste courses.
- Avalanche Transceiver/Beacon
- Snow shovel
- Avalanche probe
We recommend Simple and intuitive ORTOVOX AVALANCHE RESCUE KIT 3+
Remember it is not enough just to carry this equipment; you have to know how to use it.
How about joining one of our specialist avalanche courses – check out www.mountaintracks.co.uk/activity/avalanche-training
-
Ski Touring - Accessories
- Good pair of ski goggles with a lens for low light is essential in the event of snow and poor visibility
- Good quality sunglasses with 100% UV protection
- 35 – 40 liter rucksack
- 1 – 1.5 Liter water bottle – we don’t recommend hydration systems (e.g. camelbak) in winter as they can freeze.
- Food – bring some of your favorite hill nibbles (chocolate, energy bars)*
- Suncream and lip salve
- Camera with a large capacity memory card!
- Money – most hotels, shops and restaurants accept credit cards, but not all the alpine huts do. You should allow about 30-40 Swiss Francs or 20-30 Euros per day for lunch and drinks (amount approximate and depends on consumption)
For a hut night:
- Lightweight sleeping bag liner – now compulsory in most huts.
- Wash kit with small personal first aid items – should include:
- Toothbrush and paste - a mini one is ideal
- Soap
- Anti-bacterial hand cleaner
- Wet wipes – essential to try to maintain hygiene
- Tissues and toilet roll
- Plasters – of various sizes and possibly some adhesive wound dressings.
- Pain Killers – aspirin or Paracetamol/Nurofen
- Antiseptic cream or wipes
- Blister kit – compeed and elastic tape to hold it in place (essential)!
- (Note: Guides will have comprehensive first aid kits and are qualified in mountain first aid)
- Small light quick dry towel e.g. a Lifeventure Soft fiber towel
- Most huts have limited washing facilities
- Earplugs – it can get quite noisy!
- Headtorch - lightweight and carry spare batteries.
- Book, pack of cards and or Ipod/MP3 player – It’s nice to have something to read or listen to when you are in the huts or to challenge your fellow travelers to a game of card. These items are not essential but if you have space you might appreciate them.
We are often asked by people what they should wear in the hut. It's a good question as you don't want to carry many or any extra clothes with you if they are not required. In the winter you will probably end up wearing your base layer thermals (top & bottom) or you can carry a lightweight pair of loose trousers to wear around the hut in the afternoons/evenings. Your base layer top is what you will probably wear on your top half or you can carry a t-shirt to wear in the hut that can double to sleep in.Food and Water
We suggest you bring with you or buy in resort snack food that you can take out on the hill with you each day. Things like cereal bars, dried fruit and nuts, chocolate, sugary sweets or your favorite hill snacks. When you’re staying overnight in huts its best to take supplies for the days you are away. Huts do sell food but it’s expensive and sometimes stocks run low.
If you have any food allergies or dietary requirements especially if you are a Coeliac (Gluten free) or have a dairy allergy we strongly recommend you bring some food with you that you can supplement your dinners with. The huts are fairly good at providing for vegetarians but less so for other dietary needs.
You have to buy bottled water in the huts as usually any running water is non-potable. Bottled water is expensive in French and Swiss huts; you can be paying upto 12-16CHF per 1.5L bottle of water. So please ensure you budget for this cost. -
Ski Touring - Hiring
Most resorts have ski shops that hire ski equipment and we try to provide relevant contact details for all our courses and tours.
Prices do change by resort/country, but here’s an approximate guide to hire costs for 6-days hire:
Touring Skis plus skins and ski crampons €150-180
Touring boots €80-90
Boot Crampons €45-50
Ice Axe €30-40
Harness €20-30
Helmet €20-30
Transceiver/shovel/probe €75-80
Our guides also generally have additional sets of safety equipment (transceiver/shovel/probe) which they hire out to clients for €65 for 6 days hire. Must be booked in advance.

Andermatt is a charming 800 year old Swiss village in the Gotthard Massif and one of our favourite winter destinations!
It is renowned for its excellent snow record thanks to its geographical location. It is also renowned for its superb off-piste and the main mountain, the Gemstock has been likened to the Grand Montets in Argentiere, but with the distinct advantage that theoff-piste here in Andermatt is rarely crowded. From the top of the Gemstock you are almost at 3000m and you have a spectacular panoramic view of more than 600 summits.
Off the mountain, the village is quiet with limited apres-ski and nightlife. But it's the skiing you've come for and you won't be disappointed!!
Our top reasons for visiting Andermatt
- Untracked powder days after snowfall
- Solitude despite almost unlimited off-piste possibilities
- Cosy and rustic hotels in the picturesque village
- Excellent snow record
Resort information:
Resort Height: 1,450m
Highest Lift: 2,950m
Nearest Airport: Zurich
Transfer Options: We recommend you take the train from Zurich airport to Andermatt. Connections are regular and the its takes between 2hrs 20mins and just over 3 hours for the journey; usually with 2 or 3 changes. To look up train timetables use this link Swiss Railway Timetables
-
Insurance
It is a condition of booking that you are insured for your chosen activity and the cover must include medical expenses, personal accident, personal liability, third party risks and rescue (including helicopter rescue). You are strongly advised also to take out cover against cancellation and curtailment.
For UK residents Ski Club Travel Insurance may be a suitable option.
For more details and to purchase a policy online visit http://www.skiclubinsurance.co.uk/
If you need assistance arranging your personal insurance please let us know.
-
Swiss Travel Pass
If you are arriving into resort by train and plan to explore Switzerland before or after your trip, a Swiss Travel Pass could save you money. The Pass provides half-price fares on cable cars and funiculars in many resorts, and unlimited travel on train, bus and boat. Please find further information here.
If you only plan to book return train transfers from the airport for the Mountain Tracks tour, it is not worth buying the Pass.
-
ETIAS & EES
What is ETIAS?
- Starting in late 2026, travelers from 59 visa-exempt countries will need a travel authorization called ETIAS to enter 30 European countries for short stays.
- ETIAS is designed to enhance security by checking traveler details before arrival. It works similarly to the ESTA (USA) or eTA (Canada).
Who Needs ETIAS?
If you hold a British passport or a passport from any other visa-exempt country, you’ll need to apply for ETIAS before traveling to Europe.
How Much Does ETIAS Cost?
- The official ETIAS application costs €20.
- You do not need to pay if:
You are under 18 or over 70
You are a family member of an EU national and meet the conditions
How Long Can I Stay in Europe?
With a valid ETIAS:
- You can stay up to 90 days within any 180-day period in the countries that require ETIAS.
Important: Cyprus counts its stay separately, so check local rules if visiting.
How Long is ETIAS Valid?- ETIAS is valid for 3 years or until your passport expires, whichever comes first.
- You can enter and exit multiple times during this period, as long as you stay within the overall 90-day limit.
For the latest, up-to-date information, visit the official ETIAS website here. https://travel-europe.europa.eu/en/etias
EES (Entry/Exit System)
The Entry/Exit System (EES) is an automated IT system developed by the European Agency for the operational management of large-scale IT systems. Its primary purpose is to register travellers from third countries each time they cross an EU external border. Here are the key points:
-
What is EES?
- The EES is an automated IT system designed for registering non-EU nationals travelling for a short stay.
- It records and stores the date, time, and place of entry and exit when these travellers cross the external borders of European countries using the EES.
- The system calculates the duration of the authorized stay and generates alerts to EU Member States when the authorized stay expires.
-
Who Is Affected?
- The EES applies to non-EU nationals travelling for a short stay (up to 90 days within any 180 days) to European countries using the EES.
- Exemptions apply; for example, holders of EU or Schengen Area passports or valid visas are exempt from EES registration.
-
Advantages of EES:
- Saves time by replacing manual passport stamping.
- Automates border control procedures for more efficient travel.
- It helps identify travellers who overstay or use fake identities or passports.
- Contributes to preventing, detecting, and investigating serious criminal offences.
-
Ski Touring - Guides
All our ski tours are led by experienced and qualified guides. In most cases, this means IFMGA-certified Mountain Guides, although some trips may be led by aspirant guides or local professionals, depending on local regulations and safety considerations.
-
Accommodation Information
You will stay 3 nights in one of Andermatt’s many hotels on a B&B basis (twin rooms). Four nights will be spent in high alpine huts. Accommodation in the huts is in dormitories. Breakfast and evening meals are provided and food is plentiful and nutritious.
This season we have secured a very comfortable Hotel 3 KÖNIGE & POST (rooms may vary and will be allocated randomly).
-
Trip level & Stamina requirements
To ensure a safe and enjoyable experience for everyone, all participants must meet the specified skill and stamina levels required for each trip, as outlined on the trip’s page at the time of booking.
Please keep the following in mind:
-
Trip Requirements: Before booking your trip, please review and confirm that you meet the necessary skill and stamina levels. These requirements are in place to ensure the safety and enjoyment of all participants.
-
Guides' Discretion: Our guides and instructors are dedicated to maintaining the highest safety standards. They have the authority to exclude any participant who does not meet the required skill or stamina levels or whose participation could compromise the group's safety. This decision will be made with the utmost consideration.
-
Responsibility for Costs: Should you be unable to continue with the trip due to inadequate skill or stamina, any additional expenses incurred will be your responsibility.
We appreciate your understanding and cooperation. Our goal is to provide a memorable and safe adventure for everyone. If you have any questions or concerns about the requirements, please do not hesitate to contact us.
For further information please refer to the Terms & Conditions.
-
-
Mountain Tracks Benefits Community
When you book with Mountain Tracks, you’re not just securing your adventure—you’re joining our exclusive benefits community. As part of this community, you'll receive discounts from trusted suppliers, including retailers, transfer companies, rental shops, and more. Ski more, spend less!
Knowledge
- WeMountain: 90% of avalanches are triggered by the victim or someone in their party. WeMountain offers e-learning courses that aim to educate and inform, helping to reduce accidents and save lives in the mountains. Enjoy a 20% discount with our code.
Use code: SAFEWITHMOUNTAINTRACKS - Backcountry Books: Guidebooks and maps for ski touring, off-piste skiing and snowboarding. Please contact us directly for your discount code.
Equipment
- Lockwoods: Enjoy 15% off store-wide and 20% off avalanche safety equipment at this specialist ski and outdoor store.
- Profeet: Get 10% off at Profeet, a London-based store known for their BASI certified platinum* boot fitting services.
Note: For discount codes, please contact us directly. Existing clients will find these in our newsletter.
Rentals
- Intersport: Save 10% on all rentals..
- Alpy (formerly AlpinResorts). Enjoy 5% off rentals.
- Skiset: Enjoy 5% off rentals
Transfers
- Mountain Drop-Offs: Get 10% off transfers.
Use code: MTRKCHX - Alps2Alps: Save 5% on transfers.
Use code: mountaintracks - LiftsTo
With these exclusive discounts, we make it easier for you to enjoy your mountain adventures. If you have any questions or need more details, don’t hesitate to contact us!
- WeMountain: 90% of avalanches are triggered by the victim or someone in their party. WeMountain offers e-learning courses that aim to educate and inform, helping to reduce accidents and save lives in the mountains. Enjoy a 20% discount with our code.
Location

Andermatt
Gallery

View Gallery
 Travel Website Development